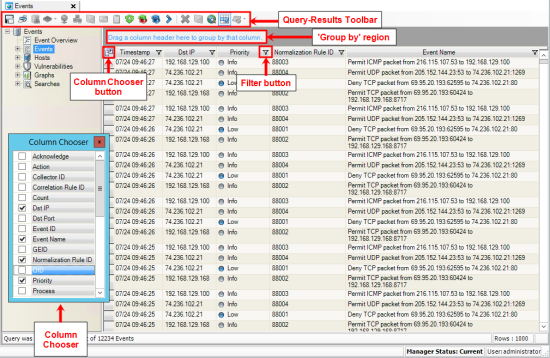
When you query an Event-Management Database, TLC may present the query results (i.e. Events, Hosts, or Scanner Events) in a table. For example, if you select the Events option for an Event-Management Database in the Event-Database Viewer, TLC presents the queried Events in a table in the main pane of the viewer (see Figure 42).
To generate query results consisting of Events, Hosts, or Scanner Events, see:
Working with the Event-Database Viewer
To work with the query results, you can use the Query-Results Toolbar (see Table 37). The following factors determine which buttons TLC presents in the query-results button bar.
The type of data in the query results (i.e., Events, Hosts, or Scanner Events).
Whether or not any items are selected in the query results.
You can also access the available options by right-clicking an item in the query results.
In a query-results table, as well as some other tables in the TLC Console, you can modify the table with the following features.
To add or remove columns to/from the table:
| a. | Click the Column Chooser (or Field Chooser) button in the upper left corner of the main pane (see Figure 42). |
| b. | In the Column Chooser dialog, select the columns you want and then close the dialog. |
To sort the items in the table by the contents of a column, click the column's label. (To reverse the order, click the label a second time.)
To limit the table to items with a specific value in a column, click the Filter button to the right of the column's label (see Figure 42). For further details, see Filtering Table Contents.
To group the items by the contents of a column, drag the column header to the region at the top of the main pane labeled Drag a column header here to group by that column. To ungroup the items, drag the column header back to the main pane.
|
Tips |
To enable or disable the column grouping feature, select or clear the Display 'Group by' region option in your TLC Table Settings (see Changing TLC Settings). |
|---|
|
Button |
Description |
|---|---|
|
|
Next x Events. Opens the next page of Events. Note: The maximum number of Events on each page is determined by the Limit Events Per Query setting (see Table 66). |
|
|
Save Table Layout. Saves any changes made to the table layout. |
|
|
Print. Prints all or selected items. |
|
|
Search for Events. If an item is selected, opens the Task Manager and auto-populates the Filter Wizard tab with conditions for the selected item. For more information, see Working with the Task Manager. |
|
|
Search for log messages. If an item is selected, opens the Search tab in the Audit Logger and auto-populates the tab's Terms field (see Searching for Log Messages). To populate the Terms field with a field value, select the column for the field and click Selected Cell. To populate the Terms field with the unique ID for the selected item, select Unique ID. |
|
|
Tripwire Enterprise Query. Queries your Tripwire Enterprise Server for 1) nodes with an IP address selected in the displayed list of Events, or 2) elements with an Object Identifier (OID) selected in the displayed Events. Note: This button is only visible if your Tripwire Enterprise Server has been added to TLC (see Working with Tripwire Enterprise Servers). For more information about this feature, see the Integration Guide: Tripwire Enterprise & Tripwire Log Center PDF on the Tripwire Customer Center: |
|
|
Internet Tools. Opens the Internet Tools tab if an IP address is selected (see Working with Internet Tools). |
|
|
Diagram Events. Opens the Event Relationship tab if two or more items are selected (see Event-Relationship Diagrams). |
|
|
Email details for selected items. Sends an email with details about each selected item to specified recipients. |
|
|
Email summary for selected items. Sends an email with a description of each selected item to specified recipients. |
|
|
Copy selected items to Clipboard. Copies selected items to your clipboard. |
|
|
Cancel Query. Stops a running query. |
|
|
Active Refresh. Enables/disables active refreshing. If enabled, TLC refreshes the view with the latest data from the queried database. The refresh interval is defined by the Active Refresh interval in your Miscellaneous TLC Settings (see Changing TLC Settings). If enabled, TLC displays If disabled, TLC displays |
|
|
Get new Events. Refreshes the current view and polls the Normalization Engine and Correlation Engine for new data. |
|
|
Refresh Events. Refreshes the current view with the latest data in the queried database. |

|
Delete selected items. Deletes selected items from the database. |
|
|
Resolve IP addresses. Resolves selected IP addresses. |
|
|
View acknowledged Event Tickets. Displays items with acknowledged Event Tickets in the current view. |
|
|
Acknowledge Event Tickets for selected items. To acknowledge an Event Ticket to which an item is assigned, click Acknowledge Events and select an acknowledgment (see Acknowledging Event Tickets). |
|
|
Normalization options. Presents the following options for a selected Event. To create a new Normalized-Message Filter with conditions specifying field values in the Event, select Create Normalized-Message Filter. For further details, see Working with Normalized-Message Filters. To edit the properties of the Normalization Rule that normalized the Event, select Edit Normalization Rule. For more information, see Working with Normalization Rules. To disable the Normalization Rule that normalized the Event, select Disable Normalization Rule. |
|
|
Assign selected items to Event Ticket. Assigns selected items to a new or existing Event Ticket. For more information, see Working with Event Tickets in the Event-Database Viewer. |
If the Show Filter buttons in column headers setting is enabled in the Grid Settings page of your TLC Settings (see Changing TLC Settings), you can filter the contents of a table in the TLC Console.
To limit the contents of a table to rows with specific values in a column:
| 1. | Click the Filter button to the right of the column's label (see Figure 42). |
| 2. | From the drop-down menu, select a literal value or one of the options in Table 38. |
If you select Custom, the Enter filter criteria dialog opens. To complete this dialog:
| a. | Define the first condition by selecting an Operator and an Operand. |
| b. | (Optional) To add another condition, click Add Condition. |
| c. | Once all conditions have been defined, click OK. |
To remove a condition, click the square button to the left of the condition and click Delete Condition. To select multiple conditions, use the CTRL or SHIFT key.
|
Option |
Description |
|---|---|
|
All |
Shows all of the table's contents. |
|
Custom |
Limits the table's contents to rows with values in the selected column that satisfy specified criteria. |
|
Blanks |
Limits the table's contents to rows with a null value in the selected column. |
|
NonBlanks |
Limits the table's contents to rows that have a value in the selected column. |
In the Configuration Manager (see Table 36), you can modify a table in the workspace and save the updated layout for future use.
To enable this feature:
| 1. | From the menu bar, select Options > Settings. Settings. |
| 2. | In the side bar of the Settings dialog, click the User Settings slider panel. |
| 3. | In the Table Settings page, select the following check boxes and click OK: |
Display 'Group by' region
Show Filter buttons in column headers
To save the layout of a workspace table in the Configuration Manager:
| 1. | In the side bar, select Resources > Configuration Manager. Configuration Manager. |
| 2. | In the side bar of the Configuration Manager, select an option (for example,  Resources > Resources > Monitored Assets). Monitored Assets). |
| 3. | Modify the layout of the table in the workspace. |
| 4. | Click  Save Table Layout. Save Table Layout. |
When you return to this page in the future, TLC will use the saved layout to present data in the workspace table.


 in the lower right corner of the main pane.


