Collector: Advanced Windows Collector (SSL) or WinLog Collector (WMI)
|
Tip |
For the collection of log messages from Windows Event Logs, Tripwire recommends the use of the Advanced Windows Collector, rather than the WinLog Collector. However, if you plan to collect Windows Event Logs from a Windows system with the WinLog Collector, you must complete the steps in Appendix I. Configuring a Windows User Account for the WinLog Collector. |
|---|
If you are using the Advanced Windows Collector and Tripwire Axon Agent for TLC software has already been installed on the Windows system, proceed to Step 2. Configure Audit Settings .
|
Tip |
To install Tripwire Axon Agent for TLC, see Installing Tripwire Axon Agent using a Pre-Shared Key. |
|---|
If you are using the WinLog Collector, TLC can collect log messages from the Windows system via synchronous and asynchronous connections. To configure the Windows system to send log messages to TLC, you must first configure WMI to establish synchronous or asynchronous connections with the Manager that will host the WinLog Collector to which the system will send its log messages. For further details, see:
Synchronous connection: https://msdn.microsoft.com/en-us/library/aa389290(VS.85).aspx
Asynchronous connection: https://msdn.microsoft.com/en-us/library/aa389286(VS.85).aspx
With a synchronous connection, TLC will poll the system for messages. With an asynchronous connection, TLC will establish a hook within the Windows operating system (OS), and then the OS will send messages by initiating a connection with the Manager.
|
Tip |
Tripwire recommends the use of synchronous connections for environments with strong ACLs or connections that traverse a firewall. |
|---|
In this Step, complete the appropriate procedure for your TLC environment:
Configure a Single Windows System to Audit Events
Configure all Windows Systems for a Domain Controller to Audit Events
|
Caution |
As the number of audited events increases, the system may experience a shortage of available memory. |
|---|
To configure auditing on a single Microsoft Windows system:
| 1. | To open the Local Security Policy window, enter secpol.msc at the command prompt. |
| 2. | To configure Security Settings for the system's Audit Policies: |
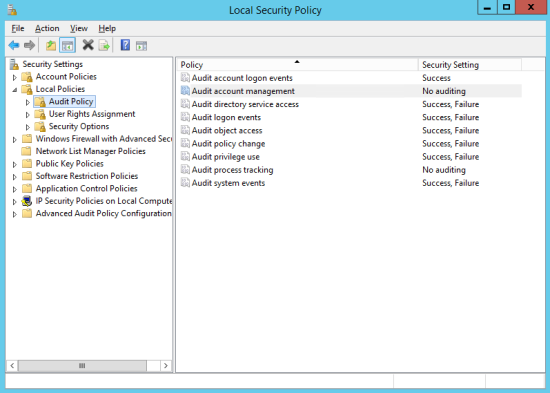
| a. | In the left panel, select Local Policies > Audit Policy (see Figure 63). |
| b. | In the main pane, double-click an Audit Policy. |
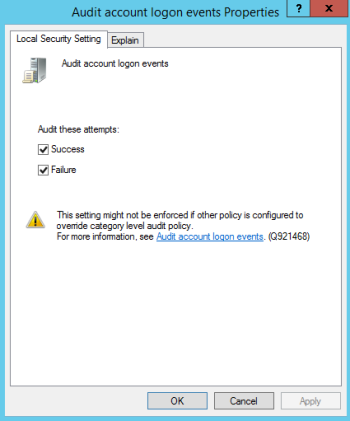
| c. | In the Local Security Setting tab of the Audit Policy properties dialog (see Figure 64), select Success and/or Failure, and then click OK. |
| d. | As needed, repeat the steps above to configure other Audit Policies. |
Figure 63. Audit Policies in the Local Security Policy window on Windows 2012
Figure 64. Audit Policy properties dialog on Windows 2012
| 3. | To configure Security Settings for the system's Security Policies: |
| a. | In the left panel, select Local Policies > Security Options. |
| b. | In the main pane, double-click Audit: Audit the access of global system objects. |
| c. | In the Security Policy properties dialog, select Enable and click OK. |
| d. | In the main pane, double-click Audit: Audit the use of Backup and Restore privilege. |
| e. | In the Security Policy properties dialog, select Enable and click OK. |
To configure auditing for all Windows systems under a Domain Controller:
| 1. | To open the Active Directory Users and Computers window, select Start > Administrative Tools > Active Directory Users and Computers. |
| 2. | In the left panel, right-click the Domain Controller and select Properties. |
| 3. | In the domain properties dialog, select the Group Policy tab and double-click Default Domain Policy. |
The domain's Audit Policies are presented in the Group Policy Object Editor (see Figure 63).
Figure 65. Audit Policies in the Group Policy Object Editor
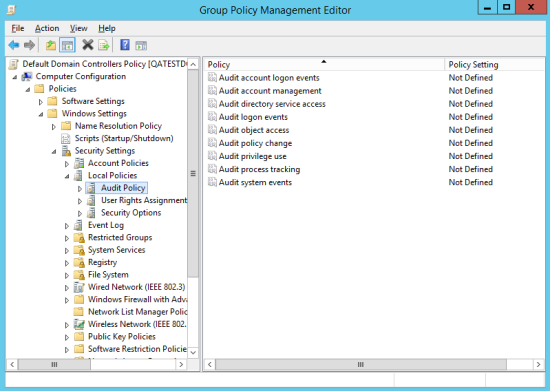
| 4. | To configure Security Settings for the domain's Audit Policies: |
| a. | In the left panel, select Local Policies > Audit Policy (see Figure 63). |
| b. | In the main pane, double-click an Audit Policy. |
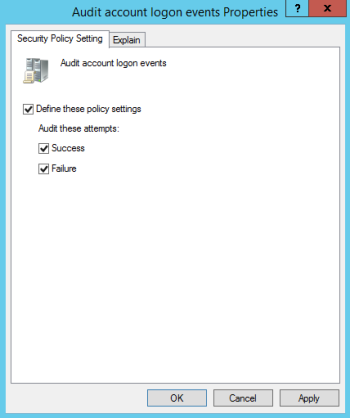
| c. | In the Local Security Setting tab of the Audit Policy properties dialog (see Figure 64), select Success and/or Failure, and then click OK. |
| d. | As needed, repeat the steps above to configure other Audit Policies. |
Figure 66. Audit Policy properties dialog
| 5. | To configure Security Settings for the domain's Security Policies: |
| a. | In the left panel, select Computer Configuration > Windows Settings > Security Settings > Local Policies > Security Options. |
| b. | In the main pane, double-click Audit: Audit the access of global system objects. |
| c. | In the Security Policy properties dialog, select Enable and click OK. |
| d. | In the main pane, double-click Audit: Audit the use of Backup and Restore privilege. |
| e. | In the Security Policy properties dialog, select Enable and click OK. |
For descriptions of event IDs audited by systems running Microsoft Windows, see:
https://www.ultimatewindowssecurity.com/securitylog/encyclopedia/Default.aspx
For more information about the collection of log messages from Microsoft Windows with the WinLog Collector, see:
How to troubleshoot WMI-related issues
https://msdn.microsoft.com/en-us/library/aa394603(v=vs.85).aspx
TLC Knowledge Base: Cannot connect to Windows Assets
|
Next |
If you are performing initial configuration of your TLC environment, see Configuring your TLC Environment. Otherwise, see Adding a Monitored Asset for a new Log Source. |
|---|
|
Tip |
If you have any problems collecting log messages from a Windows system with the WinLog Collector:
|
|---|