 Administration Manager.
 Database Permissions control user access to the Event-Management Databases in your TLC environment. You can configure the Database Permissions for all User Accounts and Groups in:
The Permissions tab tab of the Event-Management Database properties dialog (see Table 107), and
The Database Permissions dialog in the Administration Manager (see Figure 48).
These UI components are identical, and you can perform the same functions in both.
To configure the user permissions for an Event-Management Database in the Administration Manager:
| 1. | In the side bar, select Resources >Administration Manager. |
| 2. | In the side bar of the Administration Manager, expand the  Permissions. Permissions. |
| 3. | Under Permissions, expand the Databases group. This group contains the Event-Management Databases in your TLC environment. |
| 4. | Select a database. |
| 5. | In the workspace, TLC presents a list of the User Accounts and Groups with permissions for the database. Table 63 defines each Database Permission. |
|
Permission |
Grants users the ability to ... |
|---|---|
|
View |
... view the database's Events in a Database Viewer (see Working with the Event-Database Viewer). |
|
Delete |
... delete or archive Events in the database. |
|
Insert |
... add Events to the database. |
|
Clear |
... delete all Events in an Event-Management Database prior to sending log messages to the database from the Audit Logger (see Sending Log Messages to an Event-Management Database). |
To change the current permission settings, or to change the list of accounts and groups, double-click in the workspace. The Database Permissions dialog opens (see Figure 48).
Figure 48. Database Permissions dialog
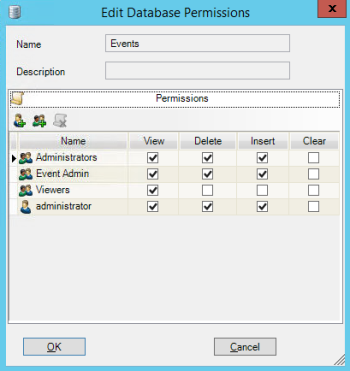
| 6. | As needed, modify the list of user accounts and groups with Database permissions. |
To add a User Account, click Add User.
To add a User Group, click Add Group.
To remove an account or group, select the item and click Remove.
| 7. | Configure the permissions for each User Account and Group. |
To enable a permission, select the applicable check box.
To disable a permission, clear the applicable check box. Once all User Accounts and Groups have been configured, click OK.
| 8. | Once all User Accounts and Groups have been configured, click OK. |
You can also assign Database Permissions in the properties dialog of a User Account or Group. In the Database Permissions tab, you can specify the permissions that apply to the account or group.
To open the properties of a User Account:
| 1. | In the side bar, select Resources >Administration Manager. |
| 2. | In the side bar of the Administration Manager, select  Users. Users. |
| 3. | In the workspace, double-click the User Account. |
To open the properties of a User Group:
| 1. | In the side bar, select Resources >Administration Manager. |
| 2. | In the side bar of the Administration Manager, select  User Groups. User Groups. |
| 3. | In the workspace, double-click the User Group. |
To configure the Database Permissions tab:
| 1. | Add any Event-Management Databases to which you want to grant the User Account or Group access. |
| a. | Click Add. Add. |
| b. | Select a database from the drop-down list and click Add. |
| 2. | To enable a Database Permission (see Table 63), select the applicable check box. |
To disable a permission, clear the applicable check box.
| 3. | Once all permissions have been configured, click OK. |