Firmware: All
Collector: Check Point Collector
To configure a Check Point firewall to send log messages to TLC, complete the following steps:
Step 1. Configure Logging on the Check Point Management Server
Step 2. Initialize the SSL Connection (optional)
In this step, you will create a new OPSEC Application Object for the firewall. You will also save the Activation Key, Client Distinguished Name, and Server Distinguished Name in a text file. When you configure a Monitored Asset for the firewall in TLC, you will enter these values in the Asset's Check Point Options tab (see Table 50).
To configure Check Point logging, complete the following steps in the Check Point SmartDashboard on the Check Point Management Server:
| 1. | In the left pane, expand Servers and OPSEC Applications. |
| 2. | Right-click OPSEC Applications and select New > OPSEC Application... |
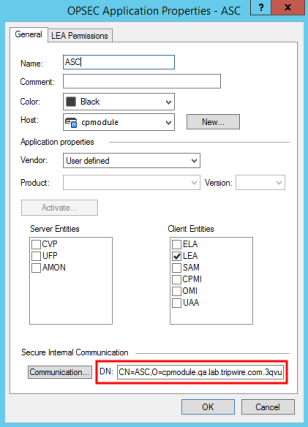
| 3. | Complete the OPSEC Application Properties dialog (see Figure 58). |
| a. | In the Name field, enter the distinguished name (case sensitive) for the OPSEC Application Object created for the Check Point firewall. |
| b. | From the Host menu, select the Check Point logging server. The logging server is the host from which log messages will be collected. Typically, the logging server is either a standalone log server or the Check Point Management Server. |
| c. | From the Vendor menu, select User Defined. |
| d. | In the Client Entities pane, select the LEA check box. |
|
Note |
Do not select any Server Entities. |
|---|
| 4. | In the OPSEC Application Properties dialog, click Communication. |
| 5. | In the Communication dialog: |
| a. | Enter and confirm an Activation Key to be used as a one-time password. |
| b. | In a text file, copy and save the Activation Key for future reference. |
| c. | Click Initialize. |
| d. | Click Close and then OK in the confirmation dialog. |
| 6. | To verify and push the firewall policy: |
| a. | Select Policy > Verify. |
| b. | Select Policy > Install. |
| 7. | When you complete and close the Communication dialog, Check Point adds the Distinguished Name for the new OPSEC Application Object in the DN field of the OPSEC Application Properties dialog (see Figure 58). |
In the text file in which you saved the Activation Key, copy and save the Distinguished Name. When you configure a Monitored Asset for this firewall in TLC, you will enter this value in the Client Distinguished Name field of the Asset's Check Point Options tab (see Table 50).
|
Note |
Distinguished Names are case sensitive. |
|---|
Figure 58. The DN field in the OPSEC Application Properties dialog
| 8. | To identify the Distinguished Name of the Check Point Logging Server from which TLC will collect log messages: |
| a. | In the left pane of the Check Point SmartDashboard, expand Network Objects > Check Point and double-click the logging server. |
| b. | In the General Properties page of the Check Point Logging Server's properties dialog, the Distinguished Name appears under the Secure Internal Communication heading. |
In the text file in which you saved the Activation Key and Client Distinguished Name, copy and save the logging server's Distinguished Name. When you configure a Monitored Asset for this firewall in TLC, you will enter this value in the Server Distinguished Name field of the Asset's Check Point Options tab (see Table 50).
|
Note |
If the Distinguished Name does not begin with “cn=” or does not appear under the Secure Internal Communication heading, contact Check Point Support to acquire the Distinguished Name. |
|---|
| 9. | If a firewall has been installed and configured on the Check Point Logging Server, complete the following steps: |
| a. | On the firewall, open port 18184 (TCP) and 18210 (TCP). |
| b. | Add a new rule to the firewall policy for both FW1_lea(18184/tcp) and FW1_ica_pull(18210/tcp). |
|
Note |
The FW1_ica_pull rule can be removed once a secure connection has been established between the logging server and TLC. |
|---|
| c. | Verify and push the policy. |
If you intend to use SSL to authenticate TLC with Check Point, complete the following steps on the Check Point firewall:
| 1. | In the following file, set the auth_type to ssl_opsec: |
$FWDIR/conf/fwopsec.conf
For example:
lea_server auth_type ssl_opsec
| 2. | At a command prompt, run the following command: |
cpstop
fw putkey -opsec -ssl <Manager_IP>
cpstart
Where <Manager_IP> is the IP address of the TLC Manager that will collect log messages from the firewall.
|
Next |
If you are performing initial configuration of your TLC environment, see Configuring your TLC Environment. Otherwise, see Adding a Monitored Asset for a new Log Source. |
|---|
|
Caution |
When creating a Monitored Asset for Check Point (see Working with Monitored Assets), you must enter the host name of the logging server's Fully-Qualified Domain Name (FQDN) in the Name field of the Monitored Asset properties dialog. For example, if the Check Point Logging server is checkpoint1.tripwire.com, you would enter checkpoint1. This value should be the host name of the FQDN entered when Check Point was initially installed and configured. To troubleshoot any issues with the FQDN, contact Check Point support. |
|---|
If you run TLC from the command line using Tlc.LogManager.Cli.exe, and you invoke debug mode on both the Check Point options and the Collector, TLC opens the LEA window, which is spawned by ascLEAlibCLI.exe. If the LEA window crashes, the problem is most likely due to one or more of the following factors:
The Check Point certificate has already been pulled. In this case, delete the certificate file (opsec.p12), delete and re-create the OPSEC object in Check Point, and pull the certificate again.
The host OS is running some type of Host IPS (e.g., McAfee, Symantec, ISS, Cisco SCS). When the LEA client is called, TLC invokes another process that many Host IPS systems interpret as a rogue process.
If you experience a problem with your Check Point connection -- for example, log messages appear in the Check Point Tracker, but not in the Audit Logger -- complete the following steps:
| 1. | In the Logging tab of the Manager's properties dialog (see Table 42), set the Logging Level for the Check Point Collector to Debug. |
| 2. | In the Check Point Options tab of the Monitored Asset's properties dialog (see Table 50), select Debug from the Debug Log Level menu. |
| 3. | Push updates to your Managers (see Pushing Updates to your Managers). |
| 4. | Stop the TLC Manager Service (see Table 73). |
| 5. | Run Tlc.LogManager.Cli.exe in the directory in which TLC Manager is installed. |
Exporting Check Point log files
Tripwire Log Center also supports importing events using the file collection module. If you would like to collect events in this manner, enter the following command to export Check Point log files from the firewall:
fwm logexport -n -p -o <logfile>
This file can now be imported with the File Collector after you create a Monitored Asset and assign the appropriate Check Point rules.
Send Check Point log files via Syslog
To configure Check Point to send log messages to TLC via Syslog, complete the following steps at a command prompt on the Check Point system:
| 1. | Connect to the Check Point Server via SSH using Admin rights. |
| 2. | To enter expert mode, enter: |
expert
| 3. | Enter your expert password. |
| 4. | To send the firewall log to Syslog, enter: |
fw log -ftnpozl | logger &
| 5. | Complete the steps in Configuring a Syslog or Rsyslog Module. |