In this topic, you will learn how to configure a new Correlation Rule. Each Correlation Rule defines a process flow with which TLC correlates Normalized Messages. If the rule is enabled and assigned to a Manager's Correlation Engine (see Correlation Engines, Rules, and Lists), and the Correlation Engine receives a Normalized Message from the 'Input' (i.e. a Collector or another Correlation Rule) specified in the rule's process flow, TLC will follow the Decisions in the process flow to correlate the message. If the Normalized Message satisfies the conditions in the rule's Decisions, TLC creates a Correlated Event.
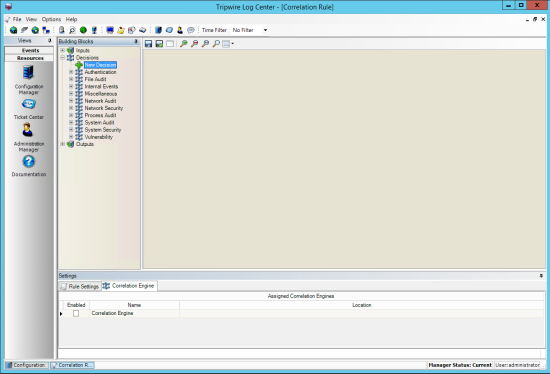
To begin, open a Correlation Rule in the Correlation Rule tab as described in Working with Correlation Rules. Figure 52 shows the Correlation Rule tab for a new rule or a copy of an existing rule.
Figure 52. Correlation Rule tab for a new rule
In the workspace of the Correlation Rule tab, you configure the process flow for the rule. In the side bar, TLC presents the available building blocks for the process flow. Building blocks include:
Inputs. Each rule's process flow begins with an Input. An Input is either a Collector or another Correlation Rule from which the Correlation Engine receives Normalized Messages.
Decisions. Decisions comprise the logical structure of the rule's process flow. Each Correlation Rule requires at least one Decision, and each Decision specifies one or more conditions that determine if TLC should continue correlating a Normalized Message. If a message satisfies the conditions for all Decisions in a rule's process flow, TLC creates a Correlated Event for the message and initiates the Output(s) at the end of the process flow.
Outputs. An Output is an action taken by TLC when a Correlated Event is created by a Correlation Rule. For an Output, TLC can initiate an Action (see What are Actions?), or pass the Correlated Event to an Event-Management Database or another Correlation Engine.
|
Tips |
Correlation Engines cannot be used as both the Input and Output of the same Correlation Rule. The addition of complex, custom Correlation Rules will increase CPU workloads, and rules that correlate a large percentage of collected log messages will place greater demands on your Event-Management Databases. Therefore, Tripwire recommends that you exercise discretion when creating custom rules. |
|---|
A connector is a directional line connecting two building blocks in a rule's process flow. When originating from a Decision, a green connector indicates a True response for the Decision. In other words, if a Normalized Message satisfies the Decision's conditions, TLC continues the correlation process with the next building block at the end of the connector.
Figure 53 shows a simple Correlation Rule with two Outputs, an Event-Management Database, and the Tripwire-defined Notification Action. If a Normalized Message satisfies the conditions defined by the rule's Decision, TLC saves the Correlated Event in the database and runs the Notification Action.
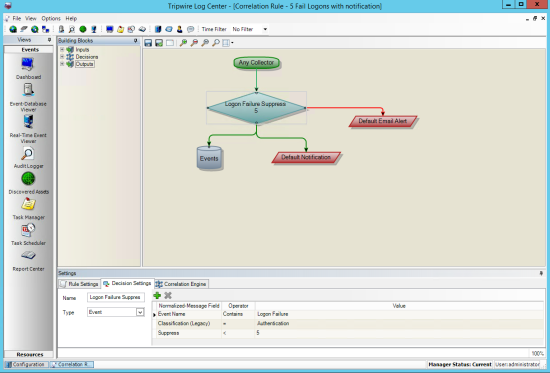
With the rule shown in Figure 53, TLC simply stops the correlation process if a Normalized Message does not satisfy the Decision's conditions. However, you can also add a Timeout connector to any Decision. Unlike other connectors (which are green), a Timeout connector is red. For example, Figure 54 shows the same rule with the addition of a Timeout connector between the rule's Decision and an Action. If a Normalized Message fails to meet the Decision's criteria within the span of time specified by the Timeout setting in the Rule Settings tab (see Table 95), TLC will run the Action.
Figure 53. Correlation Rule tab for a rule with a defined process flow
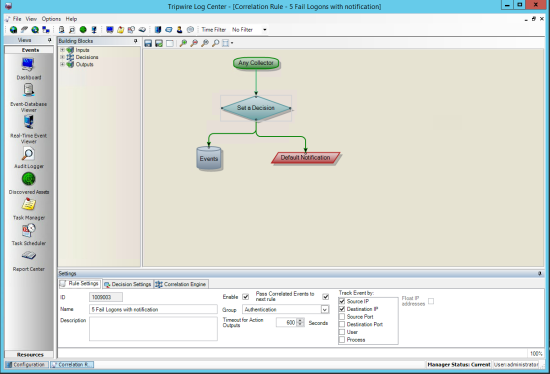
Figure 54. The same rule with a Timeout connector
To build the process flow for a new Correlation Rule:
| 1. | In the Settings panel (see Table 95), complete the Rule Settings and Correlation Engine tabs. |
| 2. | Expand the Inputs in the side bar, and drag-and-drop an Input in the workspace. |
|
Tip |
The button bar at the top of the workspace contains a number of helpful buttons. Use the |
|---|
| 3. | Expand the Decisions in the side bar, and drag-and-drop a Decision beneath the Input in the workspace. |
| 4. | In the workspace, select the Decision and configure the Decision's conditions in the Decision Settings tab of the Settings panel (see Table 95). |
| 5. | Draw a connector between the Input with the Decision. |
| a. | Select the Input. |
| b. | Click the mid-point on the bottom border of the Input and drag to the top point of the Decision diamond. |
| 6. | As needed, add and configure other Decisions in the workspace. |
| 7. | Below the last Decision in the rule's process flow, insert one or more Outputs. |
| a. | Expand the Outputs in the side bar, and drag-and-drop an Output in the workspace. |
| b. | In the workspace, select the Output and configure the Output in the Settings panel (see Table 95). |
For a Correlation Engine, configure the Correlation Output Settings tab.
For an Action, configure the Action Settings tab.
For an Event-Management Database, configure the Database Settings, Notification (optional), and Ticket (optional) tabs.
| 8. | From the last Decision, draw a connector to the Output(s). |
| 9. | Review the process flow and then click Save and Exit. Save and Exit. |
|
Tip |
If a Correlation Rule does not explicitly specify a property for a Correlated Event, TLC will assign the value from the last log message involved in the Correlated Event. For example, if the Correlation Rule does not specify an (Event) Priority in the Decision Settings tab, TLC will assign the Priority of the last log message processed by the rule. |
|---|
|
Tip |
Your changes will not take effect until you push updates to your Managers (see Pushing Updates to your Managers). |
|---|
|
Tab |
Description |
|---|---|
|
Action Settings |
This tab only appears if an Action Output is selected in the workspace. Action. The Action to be run when the rule creates a Correlated Event (see What are Actions?). Priority. (Only appears for Notification and Syslog Actions) The Priority to be assigned to notifications or Syslog messages generated by the Action. Email subject. (Only appears for Email Actions) The Subject line of the email message(s) generated by the Action when the rule creates a Correlated Event. Message content. (Only appears for Email, Notification, and Syslog Actions) The content of the message(s) generated by the Action when the rule creates a Correlated Event. Tip: To insert a variable for a Normalized-Message field in the 'Email subject' or 'Message content' fields, select the Normalized-Message field from the Content values drop-down and click Source 10.0.0.1 - Email Notification: User Logon Failure Script Arguments. (Only appears for Script Actions) Arguments to be passed to the Action's script when the rule creates a Correlated Event. To insert a variable for a Normalized-Message field in the Script Arguments field, select the field from the Content values drop-down and click Tip: For field descriptions, click here. |
|
Collector Settings |
This tab only appears if a Collector Input is selected in the workspace. To change the Collector used as the Input for the rule, select another Collector from the Collector drop-down. |
|
Correlation Engine |
Lists the Correlation Engines to which the Correlation Rule is currently assigned. To enable the rule for a Correlation Engine, select the Enabled check box for the engine. |
|
Correlation Input Settings |
This tab only appears if a Correlation Engine Input is selected in the workspace. To change the Correlation Engine used as the Input for the rule, select another engine from the Correlation Engine drop-down. |
|
Correlation Output Settings |
This tab only appears if a Correlation Engine Output is selected in the workspace. Defines conditions to convert the values of specified fields in Normalized Messages correlated by the rule. By default, when TLC creates a Correlated Event, TLC copies the Normalized Message's field values to the properties of the Correlated Event. To change the value of a field in Correlated Events created by the rule, define a condition in this tab. For field descriptions, click here. Output. The Correlation Engine to which TLC will pass Correlated Events created by the rule. To add a condition for a Normalized-Message field, click To define or change the properties of a condition: 1. From the Normalized-Message Field drop-down, select a Normalized-Message field. For descriptions of Normalized-Message fields, along with guidelines for appropriate values, click here. 2. From the Operator drop-down, select an operator. 3. In the Value field, enter a value for the condition. The operators available in the Condition drop-down depend upon the field selected in the Type drop-down. Available operators may include the following: = overwrites the Normalized-Message field value with the specified Value. + adds the specified Value to the Normalized-Message field value. - removes a specified Value from the Normalized-Message field value. To delete a condition, select the condition and click |
|
Database Settings |
This tab only appears if a Database Output is selected in the workspace. Database. The Event-Management Database in which TLC will save Correlated Events created by the rule. As appropriate, you can add conditions for the Database Output. Each condition specifies a value in a Normalized-Message field. If no conditions are added, TLC saves all Correlated Events in the specified database. If one or more conditions are added, TLC will only save a Correlated Event in the specified database if the Event satisfies all of the conditions. For field descriptions, click here. For more information about defining conditions, see the description of the Decision Settings tab. |
|
Decision Settings |
This tab only appears if a Decision is selected in the workspace. Defines the conditions for a Decision. Name. The Decision's label. Type. The type of Decision. Event. The Decision only compares the Normalized Message with the Decision's conditions. Vulnerability. The Decision also looks up IP addresses in the content of each message to determine if the message matches a Vulnerability Event in a specified Database (see What are Scanner Events?). In a Decision, each condition specifies a value in a Normalized-Message field (e.g., a Vulnerability-Event field) or a Classification Tag (see How does Classification work?). For field descriptions, click here. To add a condition, click Note: Only enabled Classification Tags can be added to a Correlation List. To enable Classification Tags, see Working with Classification Tags. To define or change the properties of a condition specifying a Normalized-Message field: 1. From the Normalized-Message Field (or Vulnerability-Event Field) drop-down, select the field. For descriptions of Normalized-Message fields, along with guidelines for appropriate values, click here. 2. From the Condition drop-down, select an operator for the condition (see Table 96). 3. In the Value field, enter an alpha-numeric value, Correlation List, or .NET regular expression. (For more information about Correlation Lists, see Working with Correlation Lists). Note: If you select Day:Time from the Normalized-Message Field drop-down, and Contains (or Not Contains) as the Condition (see Table 96), you can specify a set of time periods for Normalized Message timestamps in the Value field with the following format: <day>:<from_hour>-<to_hour>,<day2>:<from_hour>-<to_hour> datetime mask: ddd:HH-HH,ddd:HH-HH For example: Date:Time Contains Mon:4-10,Wed:6-8 With this condition, TLC will only correlate a Normalized Message if it has a timestamp that falls within the specified hours (i.e., a Monday between 4-810AM, or a Wednesday between 6-8AM). To define or change the properties of a condition specifying a Classification Tag: 1. From the Normalized-Message Field drop-down, select a Classification Tag Set. 2. From the Condition drop-down, select an operator for the condition (see Table 96). 3. From the Value drop-down, select a Classification Tag. For further details, see Examples: Conditions of Decisions in a Correlation Rule. To delete a condition, select the condition and click |
|
Notification |
(Optional) This tab only appears if a Database Output is selected in the workspace. Notification. A Notification Action to be run when the rule saves a Correlated Event in the Event-Management Database specified by the Output. Priority. A Priority to be assigned to notifications generated by the Action. Message content. The content of the message(s) generated by the Action when the rule creates a Correlated Event. To insert a variable for a Normalized-Message field in the Alert Details field, select the field from the Content values drop-down and click If you add a variable for a Classification Tag Set, the message will present the names of any Classification Tags in the Tag Set that are associated with the log message (see How does Classification work?). For example: Source 10.0.0.1 - Email Notification: User Logon Failure |
|
Rule Settings |
General settings for the Correlation Rule. ID. A unique identifier for the rule. Name. The name of the rule. Description. (Optional) A description for the rule. Enable. If selected, the rule will correlate Normalized Messages for each Correlation Engine for which the rule is enabled (see Correlation Engine tab). Pass Correlated Events to next rule. If this option is selected and the rule creates a Correlated Event, TLC will pass the event to the next Correlation Rule listed in the Correlation Engine (see Correlation Engines, Rules, and Lists). Group. The Correlation-Rule Group to which the rule belongs. To create a new group, enter a name for the group in this field. Note: If you enter a name for a new group and save the rule, TLC adds the group to the Configuration Manager. To see the group, contract and expand the Correlation Rules group in the Configuration Manager. Timeout for Action Outputs. A timeout for any Action Outputs in the rule. Track Event by. (Applies to Stateful Correlation Rules only) Specifies a Normalized-Message field(s) with which TLC will "track" Normalized Messages in the State Table. A Stateful Correlation Rule either has 1) more than one Decision or 2) a single Decision with one or more numeric conditions. For each Stateful Correlation Rule, the State Table records which of the rule's Decisions and conditions have been satisfied by one or more Normalized Messages. If you specify a Track Event By field, then TLC creates a separate record in the State Table for each unique value in the specified field. For example, if you track the rule by User Account, TLC will create a record in the State Table for each unique User Account identified by Normalized Messages correlated by the rule. Tip: For field descriptions, click here. Float IP addresses. (Applies to Stateful Correlation Rules only) If 1) this setting is enabled and 2) Source IP or Destination IP is selected in the Track Event By field, then TLC will create a record in the State Table for each unique IP address appearing in either the Source IP or Destination IP fields. For example, if Source IP is selected in the Track Event By field and the first Normalized Message identifies an attacker targeting a Destination IP address of 192.168.0.1, TLC will create a record for 192.168.0.1 in the State Table. If any subsequent messages have this IP address in the Source IP or Destination IP fields, TLC will update this record. |
|
Ticket |
This tab only appears if a Database Output is selected in the workspace. To create an Event Ticket for each Correlated Event saved in the database, configure this tab with the initial properties to be assigned to each ticket. For more information about these fields, see Table 105. |
How do Event-Priority Filters work?In the following tabs, you can select Event Priority from the Type drop-down to define a condition to filter Normalized Messages or Events: The Processed Filters tab in the Audit Logger Search tab (see Table 85) The Decision Settings tab in a Correlation Rule (see Table 95) The Filter Criteria tab in a Normalized-Message Filter (see Table 92) The Filter Wizard tab in a Task (see Table 117) The following list defines the value of each Event Priority: High = 1 Medium = 2 Low = 3 Info = Zero (0), or 4 or more To define a condition for Event Priorities, Tripwire strongly recommends that you only select the following operators from the Operator drop-down: = identifies all Normalized Messages (or Events) with Priorities that match the selected Value. != identifies all Normalized Messages (or Events) with Priorities that do not match the selected Value. For example, if you add the following condition in the Decision Settings tab of a Correlation Rule ... Event Priority = High ... TLC will only continue correlating Normalized Messages with a High Priority. For all other messages, TLC will terminate the correlation process. Similarly, if you add the following conditions in the Filter Wizard tab of a Report Task ... Event Priority != Info Event Priority != Low ... TLC will only query the specified Event-Management Database for Events with High or Medium Priorities, and the report output will exclude any other Events. |
In a Correlation Rule, each Decision consists of one or more conditions. If a Normalized Message (e.g., a Vulnerability Event) satisfies all of the conditions in a Correlation Rule's Decisions, Tripwire Log Center (TLC) triggers the rule's Outputs.
Each condition in the Decision Settings tab (see Table 95) specifies a value for a Classification Tag or Normalized-Message field (for example, an alphanumeric value, a .NET regular expression, or a Correlation List). Table 96 defines each type of operator that may be used to define a condition.
For descriptions of Normalized-Message fields, along with guidelines for appropriate values, click here. For more information about Correlation Rules and Decisions, see Defining a Correlation Rule.
The following examples illustrate how TLC applies a single condition to a Normalized Message.
Condition: User Total Unique > 6
In a Normalized Message, the User field contains the username of the user account responsible for the event that generated the log message. If the number of unique usernames in this field is more than six (6), the message satisfies the condition.
Condition: Destination IP Contains 192.168.0.*
This condition defines a .NET regular expression specifying the range of IP addresses from 192.168.0.0 to 192.168.0.255. If the message's Destination IP field does not contain an IP address in this range, the message fails the condition.
Condition: Event Type Is In My_Correlation_List
This condition specifies a Correlation List named My_Correlation_List. If the message's Event Type field contains the name of an event type specified by the Correlation List, the message satisfies the condition.
Condition: Tag Set: Administration - Tag = Account
This condition specifies a Classification Tag named 'Account,' which is saved in a Tag Set named 'Administration.' If the 'Account' Tag has been applied to the Normalized Message, the message satisfies the condition. (For more information about Classification, see How does Classification work?).
Condition: Vuln Reference Lookup CVE Identifier
This condition directs TLC to query the Common Vulnerabilities and Exposures (CVE) List. If the list contains an identifier that matches a Vulnerability Event, the Vulnerability Event satisfies the condition.
|
Note |
When Timeout is selected from the Type drop-down in the Decision Settings tab, the Condition drop-down presents In Sec, In Min, and In Hour as the available options. These options set a timeout for the Decision in seconds, minutes, or hours. For example, if you enter Timeout - In Min 10, the Correlation Engine will not forward a log message to the next building block in the rule if the Decision's conditions are not satisfied within 10 minutes. |
|---|
|
Operators |
A Normalized Message satisfies the condition if ... |
|---|---|
|
> or < |
... the specified Normalized-Message field has a numeric value that is greater or less than the condition's value. |
|
= |
... the specified Normalized-Message field contains a string that is equal to the condition's value. |
|
!= |
... the specified Normalized-Message field contains a string that is not equal to the condition's value. |
|
Tag = |
... the specified Classification Tag has been assigned to the Normalized Message. |
|
Tag != |
... the specified Classification Tag has not been assigned to the Normalized Message. |
|
Contains or Not Contains |
... the specified Normalized-Message field includes or excludes a value specified by a .NET regular expression. |
|
Is In or Is Not In |
... the specified Normalized-Message field contains or does not contain a value in a selected Correlation List. For more information about Correlation Lists, see How does Event Correlation work?. |
|
Total Unique > or Total Unique < |
... the specified Normalized-Message field contains a number of unique entries greater or less than a numeric value. |
|
Individual Count > or Individual Count < |
... the specified Normalized-Message field contains a total number of unique entries greater or less than a numeric value. For example, if a specific IP address is cited a Source IP address in a log message 5 times, and the rule's Decision is Source IP - Individual Count > 4, the rule will initiate its Outputs. Note: If you create a condition with one of these operators, Tripwire recommends that you also select at least one Track Event by option in the Rule Settings tab of the Settings panel (see Table 95). |
|
Lookup |
... it matches an identifier in the Common Vulnerabilities and Exposures (CVE) List. For more information about CVE Identifiers, see: cve.mitre.org/cve/identifiers/index.html Note: The Lookup operator is only available for a condition if 1) Vulnerability is selected from the Type drop-down in the Decision Settings tab, and 2) Vuln Reference is selected from the Vulnerability-Event Field drop-down. For more information about the Decision Settings tab, see Table 95 |
 Zoom
Zoom  Save.
Save. Insert
 Delete