Appendix I. Configuring a Windows User Account for the WinLog Collector
If you plan to collect Windows Logs from a Windows system with the , you must complete the steps below to configure a Windows user account to run the TLC Manager service.
|
Note
|
The steps below refer to a Windows Server 2008 host system. For appropriate steps on other supported operating systems, see the platform's user documentation.
|
To configure the Windows user account, complete the following steps on the Windows host system:
|
1.
|
To add the account to the required user groups: |
|
a.
|
In the Control Panel, select User Accounts. |
|
b.
|
Select Manage User Accounts. |
|
c.
|
In the Advanced tab, click Advanced. |
|
d.
|
In the Local Users and Groups dialog (see Figure 24), right-click the user account and select Properties. |
|
e.
|
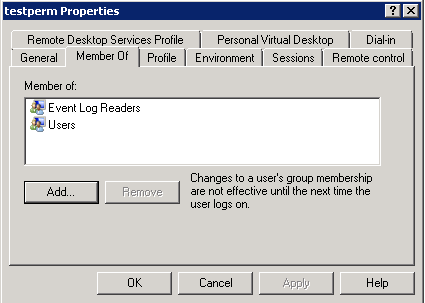
In the Member Of tab of the user account Properties dialog, add the account to the following user groups (see Figure 25): |
Event Log Readers
Users
Figure 24. Local Users and Groups dialog
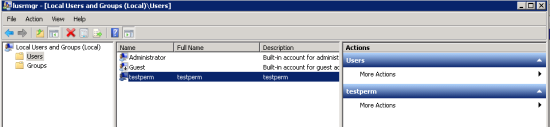
Figure 25. Member Of tab with required user groups
|
2.
|
To grant the user account access to the Security event log: |
|
a.
|
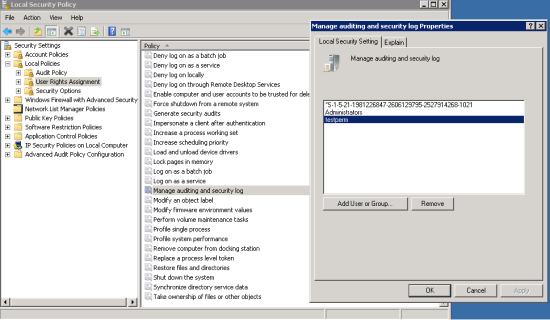
Select Start > All Programs > Administrative Tools > Local Security Policy. |
|
b.
|
In the Local Security Dialog, select Security Settings > Local Policies > User Rights Assignment > Manage auditing and security logs (see Figure 26). |
|
c.
|
In the Local Security Setting tab of the 'Manage auditing and security log properties' dialog (see Figure 26), click Add User/Group, select the user account, and click OK. |
|
d.
|
Click OK to close the 'Manage auditing and security log properties' dialog. |
Figure 26. Local Security Policy dialog and the Local Security Setting tab in the 'Manage auditing and security log properties' dialog
|
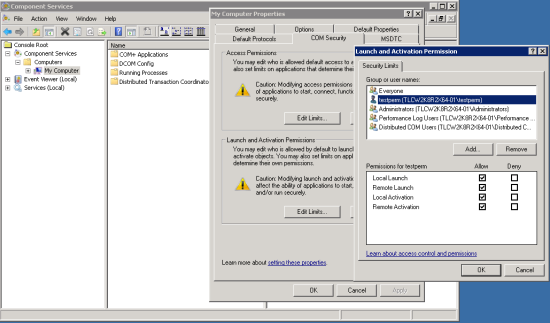
3.
|
To grant the user account required DCOM permissions: |
|
b.
|
Enter dcomcnfg.exe and click OK. |
|
c.
|
In the Component Services dialog (see Figure 27), right-click Console Root > Components Services > Computers > My Computer and select Properties. |
|
d.
|
In the COM Security tab of the My Computer Properties dialog (see Figure 27), click Edit Limits in the Launch and Activation Permissions region. |
|
e.
|
In the Launch and Activation Permission dialog (see Figure 27), click Add, select the user account, and click OK. |
|
f.
|
Select the Allow check box for each of the listed permissions and click OK. |
|
g.
|
In the COM Security tab, click Edit Limits in the Access Permissions region. |
|
h.
|
In the Access Permission dialog, click Add, select the user account, and click OK. |
|
i.
|
In the Access Permission dialog, select the Allow check box for each of the listed permissions and click OK. |
|
j.
|
To close the My Computer Properties dialog, click OK. |
Figure 27. The Component Services dialog, the COM Security tab in the My Computer Properties dialog, and the Launch and Activation Permission dialog
|
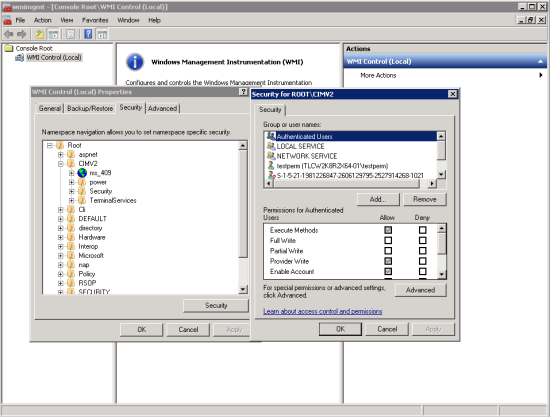
4.
|
To grant the user account required WMI namespace permissions: |
|
b.
|
Enter wmimgmt.msc and click OK. |
|
c.
|
In the wmimgmt dialog (see Figure 28), right-click Console Root > WMI Control (Local) and select Properties. |
|
d.
|
In the Security tab of the WMI Control (Local) Properties dialog (see Figure 28), select Root > CIMV2 > Security and click Security. |
|
e.
|
In the Security dialog (see Figure 28), click Add, select the user account, and click OK. |
|
f.
|
In the Security dialog, select the Allow check box for each of the listed permissions and click OK. |
|
g.
|
To close the WMI Control (Local) Properties dialog, click OK. |
Figure 28. The wmimgmt, WMI Control Properties, and Security dialogs
|
5.
|
(Optional) To test the user account with the newly configured permissions: |
|
b.
|
Enter wbemtest.exe and click OK. |
|
c.
|
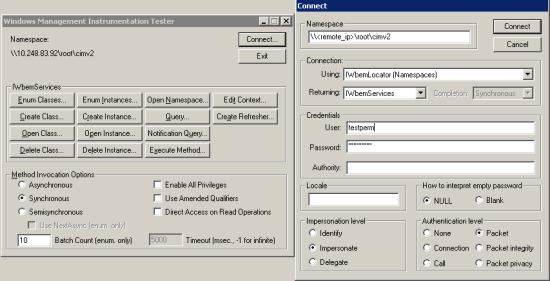
In the Windows Management Instrumentation Tester dialog (see Figure 29), click Connect... |
|
d.
|
In the Connect dialog (see Figure 29), complete the following fields and click Connect: |
Namespace: \\\root\cimv2
User and Password: The username and password of the user account
Impersonation level: Impersonate
|
e.
|
In the Method Invocation Options region of the Windows Management Instrumentation Tester dialog, select Synchronous. |
|
g.
|
Enter the following WMI query and click Apply: |
SELECT * FROM Win32_NTLogEvent WHERE LogFile? = 'Application'
If your permissions are configured correctly, the WMI Tester should present a batch of Application log events.
|
i.
|
Enter the following WMI query and click Apply: |
SELECT * FROM Win32_NTLogEvent WHERE LogFile? = 'Security'
The WMI Tester should present a batch of Security log events.
Figure 29. Windows Management Instrumentation Tester and the Connect dialog